Article
Unity Integration on React Native Android Apps
Integration of a Unity project into a React Native Android mobile app that manages the communication between the two.
January 24, 2024

In the ever-evolving landscape of mobile app development, finding the right tools and technologies to bring your creative ideas to life is very important. React Native, with its cross-platform capabilities, has become a go-to framework for building mobile applications. But what if your app requires 3D graphics, interactive simulations, or immersive experiences? That’s where Unity, a powerful and versatile game development engine, can step in to fill the gap. In this article, we’ll explore the integration of Unity in React Native Android projects, step by step, unlocking a world of possibilities. The iOS part will be covered in a second article.
Starting this integration, I’ll assume that you know the basics of Unity. But even if you don’t, this guide should lead you to success! 💪🏼
Unity Settings
To be able to integrate a unity game/scene we need to configure the export settings of the project. Let’s start there!
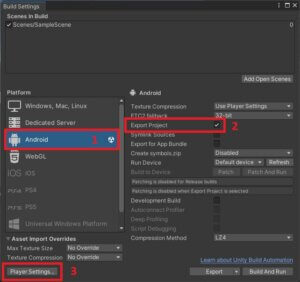
Having your project opened go to File > Build Settings. Select Android and click on the Switch Platform button, wait a bit so it processes the request, and check Export Project.
It should look like this:
After you press the Player Settings button, a new window will pop up.
Click on Other settings and uncheck Auto Graphics API then add OpenGL ES2 (even if deprecated) and OpenGL ES3 by clicking on (+) on the right.
Just below Color Gamut, I changed a few settings. Feel free to copy them or mess around on your own. 🙂

Scrolling a little bit down you can find the Configuration section. We must enable some options there. Start by changing the Scripting Backend from Mono to IL2CPP, which should allow us to enable some more Target Architectures. Follow the image below. 😉

As of now, there aren’t many smartphones that use x86 architecture but, just to minimize the odds of incompatibility let’s check all the Targets Architectures.
And for export settings, we are done.
Unity Project
Moving away from the export settings below you can find my project hierarchy.
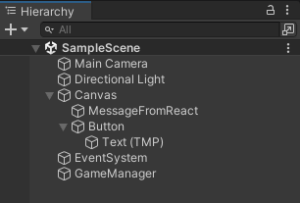
The Canvas is composed of TextMeshPro named MessageFromReact (where we will show a message that came from the react-native side) and a Button, that will send a message from unity. Another important element is the GameManager which enables the relation of each element in the canvas to a script shown below 😉
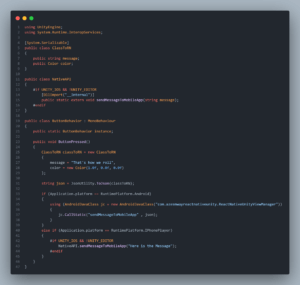
Having the elements needed, we have to work on the scripts. The first one will handle messages from react native. It looks something like this:

I’ll save it as DataFromReact.cs but you can name it whatever you want. Now we should write a script to handle the communication from the unity side. I’ll create another script named ButtonBehavior.cs for that purpose:
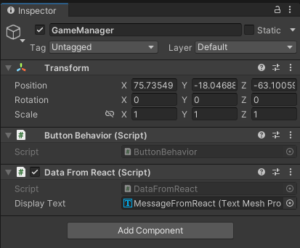
Before moving on to react native, we must first link these scripts to the game objects. The first should be linked to TextMeshPro, while the last should be linked to the Button. To do that, as I said above, we will use the GameManager.
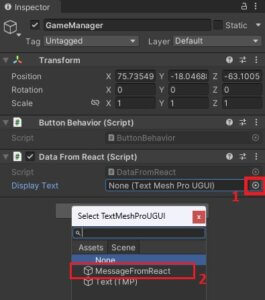
Select GameManager from the Hierarchy panel and you will see an Add Component button. Click on it. Starting with the ButtonBehavior script, you can use the search bar to find it more easily. Select it and it’s done:

To add the DataFromReact script follow the same steps as you just did and at the end on the field named Display Text select the MessageFromReact TextMeshPro element:

In the end, it should look like this:
We added the scripts to the GameManager but we still need to add the OnClick action to the button. To do that, select the Button in the Hierarchy panel and link the script via GameManager like this:

Okay, having that done we just need to export the project. To do it, just open the Build Settings one last time and hit the Export button!
React Native
This part will be relatively straightforward. A few additions in some files and a very basic screen. For the sake of simplicity, I’ll show the styling inline (Please don’t tell LOAD’s code reviewers 🤫).
Assuming that you already have a project created and running smoothly, the first step is to install the library that makes all of this possible:

Now we need to create a folder structure to place the export from Unity. In the root directory create a folder named unity. Inside that create another folder named builds and inside this one create one folder named android. For iOS it’s a different process but the exported project from Unity should also be placed inside the builds folder, but in a folder named iOS. After pasting the exported result from Unity into the android folder it should look something like this:

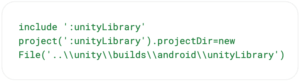
After that, it’s necessary to add the following lines to android/settings.gradle. The react native one, not the one from the unity export.
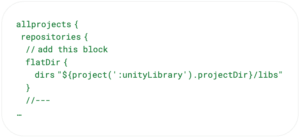
Next, go to android/build.gradle and under the repositories add the following lines.
Now add this line to android/gradle.properties.

Add this line to android/app/src/main/res/values/string.xml below your app name.

In the unity\builds\android directory create a new file named local.properties. This will allow us to specify the location of the Android SDK for the unity project. Inside it place your SDK location, something like this:

As a final step before showing you the code, go to /unity/builds/android/unityLibrary/src/main/AndroidManifest.xml and delete the <intent-filter> tag.
Removing this will prevent us from having two apps generated after the build. One from react native and another from the Unity project. This way only the react native app is generated which is what we want.
Moving to the react native code, we will start by creating a component UnityAndRn and by importing the necessary packages.
Then, we will save the UnityView ref and declare some state for text, message and buttonColor:

After that, we will prepare an object to be sent to Unity and declare a function that sends that message:

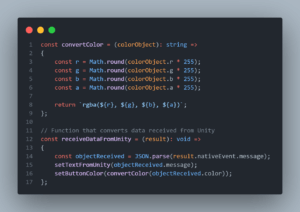
Following this block to send a message, I’ll show a block to receive a message from Unity. The first function converts the color object received to a format that can be used to style components and the second one will be used to process the messages received from the Unity project.
Finally, the JSX block is split into two halves, a top one containing a text tag that will show the message received from Unity followed by a text input to write the message and a button to send it to Unity. The bottom half contains the component from the library that we imported, where we bind the onUnityMessage property to the receiveDataFromUnity function that we had previously built.
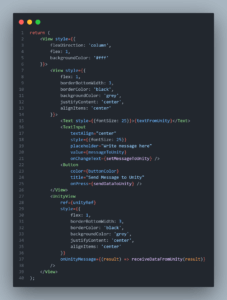
So here is the final result of the code:

And this is the final result!
As we wrap up this Unity integration in React Native Android apps, it’s clear that the marriage of these two technologies opens up exciting possibilities for mobile app development. Whether you’re building a game, a simulation, an augmented reality app, or any project that demands interactive 3D elements, this integration allows you to harness the best of both worlds. The flexibility and speed of React Native combined with the immersive capabilities of Unity create a dynamic synergy that empowers developers to deliver captivating, high-performance mobile experiences.
I hope that you find this guide easy to understand and that it helped you achieve your goal!
See you next time for the iOS version. 😉